The Nikon Coolscan V (LS-50) is a 35mm film scanner from the mid-2000s.¶ 4000 dpi, 16-bit depth per channel, an LED light source that holds its colour after twenty years, Digital ICE※ for dust removal that still isn’t really matched by modern alternatives. The hardware is beloved by film photographers. The software is a 32-bit Windows binary, a TWAIN data source that won’t install on anything released since 2015, and Nikon abandoned the product line in 2009.
So you can buy a Coolscan on eBay for $800, more than it cost new, and then spend an afternoon trying to coax NikonScan 4.0.3 into running inside a VM on a USB passthrough that half-works. Or you can reverse engineer the whole stack and write a new driver.
This project is the second option. Two deliverables:
- A complete protocol specification. Every SCSI opcode, every sense code, every byte of the
SET WINDOWdescriptor, documented from the actual binaries and cross-validated against the firmware. - A clean-room H8/3003 emulator. A Rust implementation of the scanner’s CPU that boots the original firmware binary unmodified and presents itself to Windows as a real Coolscan over USB/IP. You can point NikonScan at it and it scans.
The endgame is a modern, cross-platform driver, probably a SANE backend※, written entirely against the emulator without ever needing the physical hardware in the development loop. But before we get there, a lot of things had to be unwound.
Five layers, one scanner
A scan in NikonScan isn’t one thing. It’s a chain of five binaries passing commands down and data back up, each layer knowing almost nothing about the one two below it. The whole chain has to be unwound before any single piece makes sense.
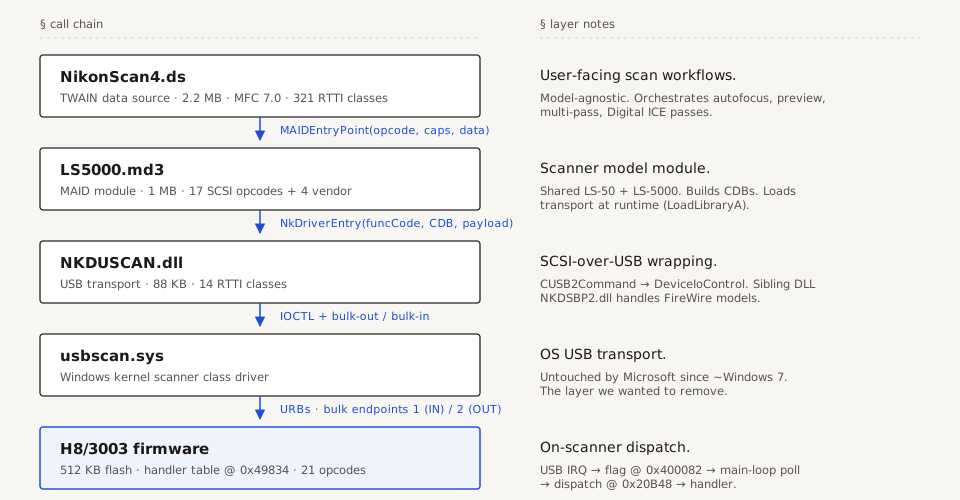
At the top, NikonScan4.ds is a TWAIN data source. A .ds file is just a renamed DLL that implements the DS_Entry export. It’s model-agnostic. It doesn’t know anything specific about the Coolscan V; it just orchestrates scan workflows (autofocus, preview, multi-pass, Digital ICE passes) and delegates the hardware details downward. Recovering it took patience: 2.2 MB of MFC 7.0, 321 RTTI-visible※ classes, and enough indirection to make cold-start reading unpleasant. The RTTI was the key. Once you have the class hierarchy, the control flow becomes obvious.
Below TWAIN is the MAID module: LS5000.md3, 1 MB, loaded at runtime. MAID stands for “Module Access Interface for Digital” and it’s Nikon’s own plugin system. NikonScan probes Module_E/ for .md3 files, calls their MAIDEntryPoint, and the module registers itself as able to handle a particular scanner type.※ The module’s job is to take a high-level MAID opcode (“set scan window”, “start preview”, “read DTC table”) and turn it into a SCSI Command Descriptor Block. 17 SCSI opcodes plus 4 vendor-specific ones, each with its own CDB builder, parameter validator, and response parser.
The interesting thing here is that LS5000.md3 doesn’t statically link the USB transport DLL. It uses LoadLibraryA("NKDUSCAN.dll") and GetProcAddress("NkDriverEntry") at runtime, which is the same pattern used for the FireWire transport (NKDSBP2.dll). That’s how Nikon kept a single module binary working across both USB and 1394 models. The module doesn’t care which transport it’s riding on. It just asks NkDriverEntry to send the CDB and waits for the response. This abstraction is clean enough that once you realise it exists, the whole call chain snaps into focus.
NKDUSCAN.dll is the USB transport. 88 KB, 14 RTTI classes, and an architecture that mirrors usbscan.sys’s IOCTL surface closely enough that you can more or less read one from the other. The important classes are CUSB2Command (owns a CDB and its response), CUSBSession (the open handle to the scanner), and CUSBDeviceTable (enumeration cache). Every SCSI command gets wrapped into three USB bulk transfers:
- bulk-out on endpoint 2: the CDB itself (6, 10, or 12 bytes)
- bulk-in on endpoint 1: the response payload, if any
- bulk-in with opcode 0xD0: phase query, asking the scanner “are you ready for the next command?”
- bulk-out with opcode 0x06: REQUEST SENSE, used to pull extended error info when something went wrong
That wrapping matters because it means the USB side isn’t quite standard bulk-only mass storage. It’s closer to the old “scanner class” driver interface that died around Windows 7. Which is also why usbscan.sys hasn’t been touched by Microsoft in fifteen years, and why getting the kernel out of the picture was so appealing once the emulator work started.
At the bottom is the firmware: 512 KB of big-endian H8/3003 code sitting in flash. The CPU is a Hitachi H8/300H: 24-bit, 16 MHz, the kind of embedded processor that showed up in everything from cars to fax machines in the late 1990s. Ghidra didn’t ship a SLEIGH※ module for it, so the project includes a community-written one. Even with that, the firmware’s control flow is obfuscated by a two-context cooperative coroutine system that hops between a “control plane” (USB polling, SCSI dispatch, state machine) and a “data plane” (DMA management, motor coordination, long-running transfers) via TRAPA #0※ and a manually swapped stack pointer at 0x400766. You don’t read the firmware top-to-bottom. You trace it as a pair of programs talking past each other.
The device-side SCSI dispatch is where the five layers collapse into one line of code. USB IRQ on vector 13 → CDB byte-copied into RAM → flag at 0x400082 set → main-loop poll sees it → dispatch at 0x20B48 → linear search of the 20-entry handler table at 0x49834 → permission check against the scanner’s current state → handler function called. That’s it. Every scan the Coolscan has ever performed went through those six steps.
The knowledge base has the full protocol in machine-digestible form: 21 SCSI opcodes, 148 sense codes, the 54-byte SET WINDOW descriptor, the ASIC’s 172 registers across 8 blocks. What matters for the rest of this article is that by phase 7, every command NikonScan can issue had a paired firmware handler documented, and every firmware handler had a known host-side call site. The protocol was closed.
The firmware is two programs
A quick digression, because this was the detail that most changed how I thought about the firmware.
The H8/3003 doesn’t have an RTOS. The Coolscan firmware could have been one big event loop, and for the first few thousand lines of decompilation I assumed it was.◇ But nothing lined up. There were calls that looked like they had to block (waiting for a motor move to finish, waiting for DMA to complete) inside functions that also had to respond to USB commands with sub-second latency.
The trick, buried at the end of startup around 0x107EC, is a handwritten two-coroutine system. Context A runs the control plane: an 8-step polling loop that checks USB, scan state, the SCSI flag, and dispatches commands. Context B runs the data plane: DMA management, motor coordination, long transfers. They share RAM freely, but when one of them needs to wait on something, it issues TRAPA #0, a software interrupt that routes to vector 8 at 0x10876. That handler saves ER0–ER6, swaps the stack pointer from a word at 0x400766, and returns into the other context’s saved PC. One CPU, two programs, no preemption, no race conditions.
Context A has 1 yield point (the idle loop). Context B has 21. That asymmetry tells you which one is driving: the control plane gets the CPU most of the time and only hands off when there’s something data-pathy to do. It’s tight, it’s a little cursed, and it’s the kind of design you only write when you have genuinely tight RAM and latency constraints.
Rewriting the scanner in Rust
Once the protocol was documented, the question was what to do with it. The obvious answer, writing a Linux driver that talks to the real scanner, was achievable but slow. Every test round meant plugging in actual hardware, dealing with USB quirks, and hoping you didn’t put the motor into a state that required a power-cycle to recover from.
The less obvious answer was to emulate the scanner instead. Not as a stub (a stub that answers a few INQUIRY commands is easy), but as an actual H8/3003 implementation that runs the original firmware binary, bit-for-bit, with no patches. If the firmware can’t tell the difference between an emulator and silicon, then NikonScan can’t either, and then neither can any new driver you write.
The emulator is a Rust workspace with four crates:
| Crate | What it does |
|---|---|
h8300h-core | The CPU. Full H8/300H instruction decoder, register file with E/R/RH/RL aliasing, 24-bit PC, 8-bit CCR, cycle-counted dispatch. |
peripherals | On-chip I/O: timers (ITU4 at 0x92), serial, DMA controller, watchdog. Everything the H8 sees via memory-mapped I/O. |
bridge | USB FunctionFS bridge to expose the emulator as a gadget on real Linux USB hardware, when you want that path. |
coolscan-emu | The scanner itself: ISP1581 USB device, ASIC model, CCD stub, motor model, memory map. Wires the CPU to the peripherals and runs the firmware. |
Clean-room, in the sense that the Rust code was written from the protocol KB and the hardware datasheets, not by decompiling the firmware into Rust. The firmware binary is an opaque blob that the emulator loads and executes; nothing about the host-side code mirrors the firmware’s own structure, and the firmware is unmodified across the entire boot sequence. First instruction fetched from the reset vector at 0x100, all the way through the two-context coroutine handoff, happens on pure emulated cycles.
It works. The firmware boots, runs its 132-entry I/O init table, does its RAM test, installs its 12 ISR trampolines, relocates the stack pointer, and drops into the coroutine system. 50 million+ instructions later, it’s idle in the main loop waiting for USB traffic. 269 tests across the workspace (68 end-to-end, 139 core, 58 peripherals, 4 bridge), 0 clippy warnings, all 11 emulator phases marked complete.
Two details worth highlighting. The ISP1581※ USB controller is modelled register-by-register, not stubbed. When the firmware configures endpoints, writes to DcHardwareConfig, reads DcInterrupt, the emulator responds exactly like the real chip. The firmware’s USB init sequence is the most fragile part of its state machine, and a plausible-looking stub will pass INQUIRY and then break three commands later. The ITU4 timer registers sit at base address 0x92, not 0x8C. That was a one-off bug that nearly cost a week before someone noticed every scan was timing out after about 4 seconds. The H8/3003 datasheet was clear, the Ghidra decompilation of the timer init routine was clear, but the initial register map had 0x8C copied from a similar-but-different H8 variant. Bugs like that are the reason you write tests against a known-good host-side dispatch path before you ever try a live scan.
Hardware-in-the-Loop without the hardware
Once the emulator was running, the next problem was getting NikonScan to talk to it. NikonScan is a 32-bit Windows program that expects a real USB scanner enumerated by usbscan.sys. There’s no Linux path to “pretend to be a USB device to a Windows VM.” Or rather, there are several, and most of them are bad.
The survey:
- Kernel
usbip-vudc. A Linux kernel module that lets userspace programs implement USB device gadgets overconfigfs. Works, requiressudo, requiresmodprobe, and has a nasty September 2025 regression where the device disconnects right after enumeration. - Raspberry Pi
dwc2. Flash a Pi Zero with a gadget profile, USB-OTG cable to the Windows host. Works, but now you own a Pi, and the emulator has to run on ARM or stream over the network. - QEMU USB passthrough from a real scanner. Requires the real scanner, defeats the point.
- Userspace USB/IP※. The emulator itself speaks the USB/IP protocol over TCP :3240. On Windows, the free
usbip-win2driver (attestation-signed, no Test Signing Mode needed) attaches to that TCP port and inserts a virtual device into Device Manager. No root on Linux, no kernel modules, no extra hardware, and the whole round-trip can be unit-tested on one machine viacargo test.
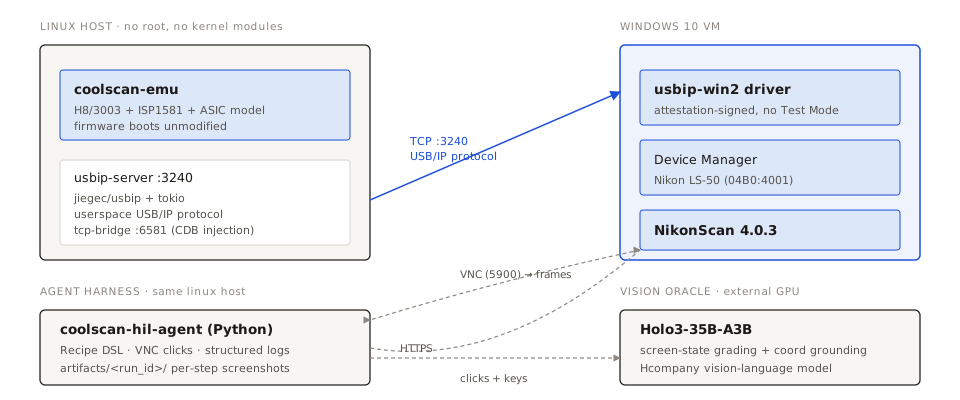
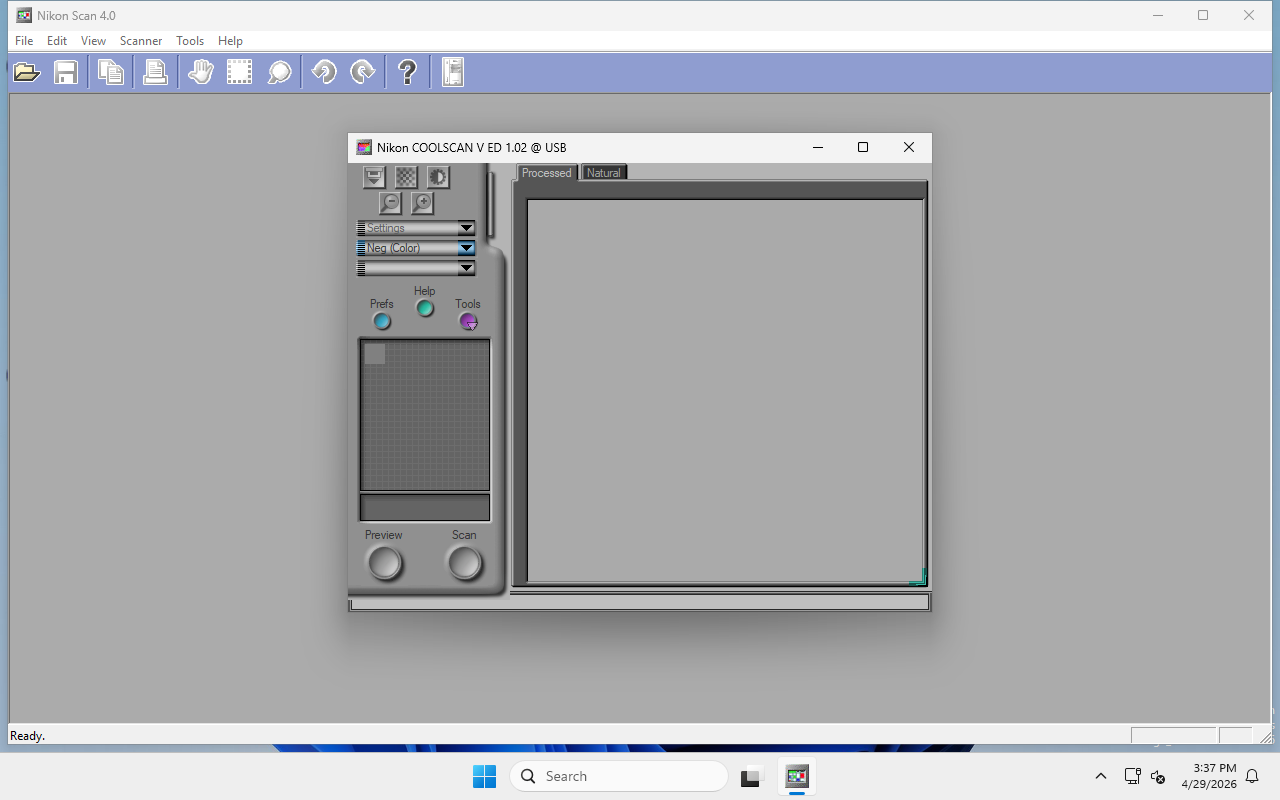
The last option turned out to be by far the best. Bring up the emulator with --usbip-server, attach from Windows with usbip attach -r <linux-ip> -b 1-1, and Device Manager shows Nikon LS-50 (VID 04B0, PID 4001). Open NikonScan, and the emulator’s log fills with INQUIRY traffic. The first time that “Scanner connected” toast popped up in NikonScan with no scanner anywhere in the room was a genuinely good day.
What USB/IP lets you do that no other approach does: run the whole test loop from cargo test. There’s a smoke test in the repo, tests/smoke_usbip_e2e.rs, that spins up the emulator, runs a USB/IP client in-process, walks it through device enumeration + INQUIRY + a short SCSI exchange, and tears everything down. The entire protocol stack gets exercised end-to-end on a single Linux box with no VMs, no sudo, and no human in the loop. That’s the test you can run in CI.
The oracle reads the screen
CI-level smoke tests are great for the USB/IP transport and the firmware boot sequence. They don’t test the thing you actually care about, which is: can NikonScan preview a frame, scan it at 4000 dpi, and write a TIFF to disk?◇ That’s a UI-level assertion, and it lives in a Windows VM, with NikonScan’s WinForms UI staring at you in a VNC window.
The stack for that is a separate Python project under emulator/hil/agent/. It does three things:
- Scripts VNC clicks through NikonScan via a recipe DSL.
Recipe("preview_smoke").open_app("NikonScan.exe").click_at(425, 360).expect_screen("scanner-source-dialog").... Each recipe is a small Python file that describes a scan workflow as a sequence of clicks, key presses, and screen-state assertions. - Grades each post-action screenshot with Holo3, an open-weights vision-language model from Hcompany, served from a GPU endpoint. After every recipe step, the agent captures a frame from VNC and asks Holo3 “is this the scanner-source dialog?” or “has the preview finished rendering?” If yes, step forward. If no, the recipe fails and dumps the screenshot for inspection.
- Falls back to Holo3 grounding when things drift. NikonScan’s UI is pixel-stable, but screen captures from a VNC pipeline sometimes aren’t (theme differences, antialiasing, the VM restoring a slightly different window position). When a scripted click lands on the wrong pixel, the recovery path sends the frame to Holo3 with “where is the Preview button” and re-grounds the coordinates live. You lose determinism on that step, but you don’t have to manually re-record the recipe every time the VM reboots.
The pattern is: scripted for speed and determinism, vision-graded for correctness, grounding-fallback for recovery. All three layers log to artifacts/<run_id>/ so a failing recipe leaves behind the full screenshot sequence + every Holo3 response, which is much better than a CI log that just says “assertion failed on line 47.”
def build() -> Recipe:
    return (
        Recipe("preview_smoke")
        .open_app("NikonScan.exe")
        .expect_screen("nikonscan-main-window")
        .click_at(425, 360)                        # Scanner menu
        .expect_screen("scanner-source-dialog")
        .click_at(380, 510)                        # Coolscan V entry
        .expect_screen("nikonscan-connected")
        .click_at(620, 130)                        # Preview button
        .wait_for_screen("preview-pane-shown", timeout_s=120)
        .assert_image_nonblank()
        .assert_file_exists(r"C:\scans\preview*.tiff")
    )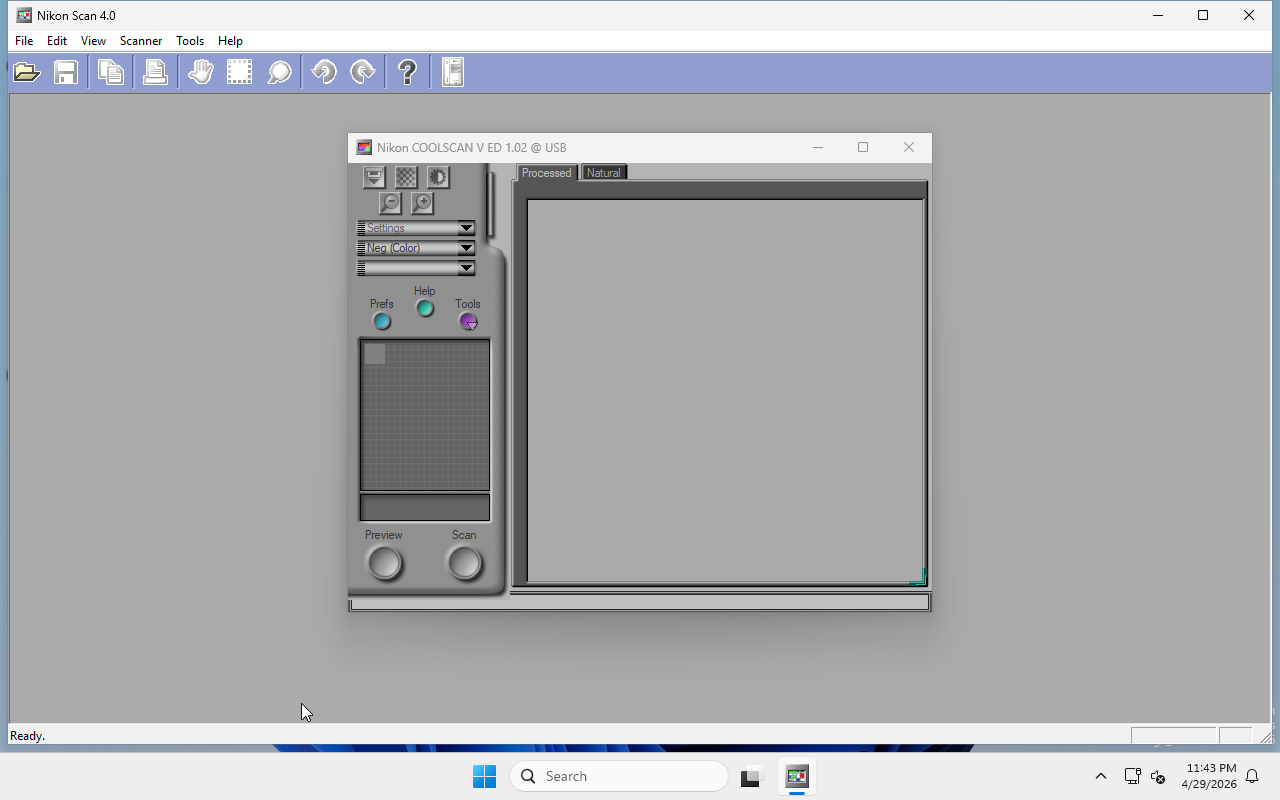
Holo3 is overkill for a pixel-stable UI. NikonScan’s Preview button is at (620, 130) today, it was there in 2005, and it will be there in any VM image you build. But the point isn’t that the oracle is strictly necessary. The point is that the oracle catches regressions the scripted clicks can’t see. If a future emulator change somehow makes NikonScan render an error dialog on top of the main window, the scripted click at (620, 130) will still “succeed” in the sense that the click happens. The oracle is what notices that the screen now says “communication error” instead of showing the main window.
Why an LLM for screen grading, instead of pHash or SSIM?
pHash against a committed baseline was actually the first approach, and it works fine for exact-match screens. The problem is that NikonScan’s UI has several screens that semantically match but pixel-differ: a progress bar at 34% vs 36%, a timestamp in a status bar, a focus highlight on a different button depending on which one was last hovered. Tuning pHash thresholds per-screen got brittle fast.
Holo3 reads the screen the way a human does. It doesn’t care that the progress bar moved two pixels, it cares whether the window title still says “Preview” and whether the preview pane is populated. The tradeoff is latency (a few seconds per check, over the network, against a paid GPU endpoint) and non-determinism (occasional false confirmations). For a test suite that runs once per feature branch and is fundamentally gated on “does a scan work end-to-end”, those tradeoffs are fine.
The recipe DSL keeps pHash as a secondary signal: each expect_screen(name, baseline_hash=...) call can take an optional committed pHash that short-circuits the Holo3 call when it matches. Fast path for stable screens, LLM path for everything else.
Where this is going
The emulator is the means, not the end. The end is a driver for the Coolscan that runs on modern operating systems, probably a SANE backend, since SANE is where Linux scanner support lives, and SANE backends are straightforward to port into other ecosystems (Apple ImageCaptureCore, cups-filters, etc.) once they exist.
What the emulator gives you that the real scanner doesn’t:
- Deterministic timing. Every
SCANcommand takes exactly the same number of emulated cycles. No motor jitter, no lamp warm-up variance, no “is the scanner ready yet.” - Full observability. Every memory access, every register read, every USB transfer is logged at the source. When the driver does something weird, you can see the exact sequence of bytes that provoked it.
- Fault injection. Want to know how the driver handles a mid-scan USB disconnect? Set a watchpoint, tear the transport, observe. Impossible to do reliably on real hardware.
- CI integration. The whole stack runs on a Linux build box. No scanner room, no flaky USB, no “works on my machine” when your machine is the only one with a Coolscan on it.
What it doesn’t give you, yet, is the actual image data. The CCD is stubbed, the calibration pipeline runs through synthetic data, and Digital ICE’s infrared channel isn’t meaningful without real photons hitting real film. Image-path fidelity is the next milestone, and the path to it is pulling the CCD data pipeline out of the firmware’s ASIC model and feeding it recorded scans from a real scanner, turning the emulator into a replay device, then into a generator. That’s the work happening now.
If this arrives at the shape I’m hoping for, someone in 2030 will plug a fifteen-year-old scanner into a Linux box, run scanimage -d coolscan-v, and get a TIFF back without ever thinking about TWAIN, usbscan.sys, or the fact that the binary driving the scanner’s CPU was last touched by Nikon in 2007. That’s the point.
Sources
The full knowledge base, the emulator source, the HIL harness, and the Holo3 agent all live in the project repository. Some anchors worth pointing at:
ARCHITECTURE.md: top-level call-chain overview with links into the KBdocs/kb/scsi-commands/: 21 SCSI opcodes + 4 vendor commands, verified confidencedocs/kb/components/firmware/: per-subsystem firmware documentation (coroutines, scan state machine, ASIC registers, motor control, ISP1581)emulator/: Rust workspaceemulator/hil/README.md: USB/IP setup for the Windows VMemulator/hil/agent/: Holo3 + recipe DSL
The firmware binary and NikonScan 4.0.3 installer are not checked in. They’re proprietary Nikon software, and the KB is written so that the protocol can be understood without them. If you own a Coolscan, the firmware is on the device; if you need NikonScan, Nikon’s archive still mirrors it.
Related prior art that was genuinely useful: kosma/coolscan-mods (hardware RE, memory map, GPIO; the starting point for the firmware analysis), the H8/300H Programming Manual, and the SCSI-2 Scanner Device specification.